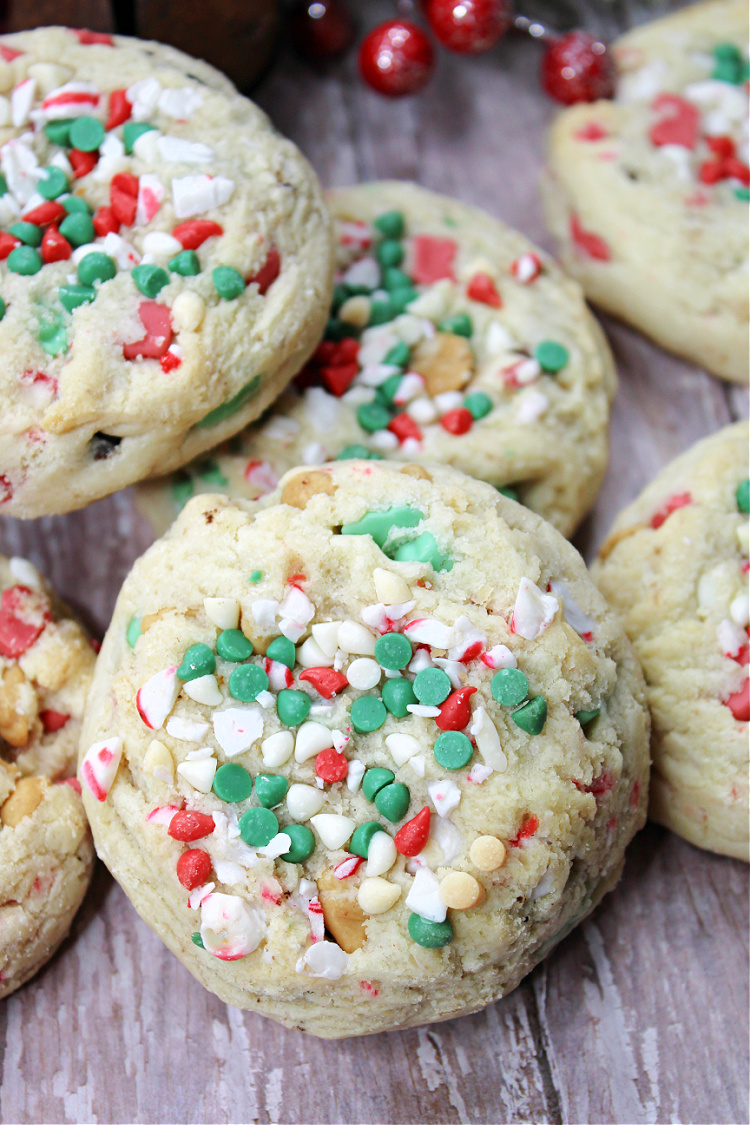
Santa’s Kitchen Sink Cookies
These Santa’s Kitchen Sink Cookies are a holly jolly version of everyone’s favorite fully loaded cookies – everything but the kitchen sink cookies! These soft, chewy cookies are loaded with a variety of baking chips, pretzels, crushed peppermint, and more for a classic Christmas flavor profile that will activate every sweet tooth you have!
I love, love, LOVE holiday baking! If you’ve been reading my blog for any length of time, you know that holiday treats hold a special place in my heart, and while decorating cookies, cupcakes, and other sweets with holiday themes is fun, I also like to stuff them full of classic holiday flavors. Sometimes it’s the flavors even more than the decorations that make holiday treats so great. That’s on full display here with my fully loaded Christmas kitchen sink cookies. These bad boys are absolutely stuffed with just about every delicious holiday flavor you can think of, and they always have everyone coming back for more again and again.
Santa’s Kitchen Sink Cookies
These delicious cookies start with a simple cookie dough that comes together quickly and easily and bakes up so soft and chewy. Then, I stuff that dough with crushed pretzels, semi-sweet chocolate chips, white chocolate chips, peanut butter chips, holiday baking chips, Christmas sprinkles, and finally crushed peppermint candy. I wasn’t kidding when I said these cookies are fully loaded! After they’re stuffed to capacity with holiday flavors, I bake them until the edges are golden, then cool them on the cookie sheet until they’re baked to soft, chewy, holly jolly perfection. They’re so good!
Why You’ll Love This Recipe
- It only uses simple baking ingredients found at any grocery store.
- It’s an easy recipe that anyone can make.
- It is absolutely overflowing with holiday flavors like chocolate, white chocolate, peppermint, and so much more.
- It’s the perfect cookie recipe for holiday parties or to make with the kids to leave out for Santa.
Ingredients
This recipe only uses simple baking ingredients to deliver all its delicious holiday flavor. You’ll find everything you need in your pantry or in one quick trip to the grocery store.
Recipe note: Each time I make these cookies, I change around the add-ins and amounts of the add-ins. We all like a cookie that’s got a lot inside and on top. But, you do what you and your family will like best. The dough is just so good that whatever amounts you choose, the cookies will turn out delicious!
For the Cookies
- 1 cup unsalted butter – softened
- 1/2 cup granulate sugar
- 1/2 cup light brown sugar
- 1 large egg
- 2 teaspoons vanilla extract
- 2 1/4 cups all-purpose flour
- 1 teaspoon baking soda, make sure it’s fresh
- 1/4 teaspoon fine sea or kosher salt
- 3/4 cups pretzels – crushed
- 1 1/4 cups semi-sweet chocolate chips
- 1 1/4 cups white chocolate chips
- 1 1/4 cups peanut butter chips, you can swap out milk chocolate chips in place of peanut butter chips if needed
- 1 1/4 cups holiday baking chips, use whatever color chips you have in the house or add in more white chocolate chips and Christmas sprinkles ( You can also use mini M&Ms
- 1 1/4 cups Christmas sprinkles
- 1 1/4 cups crushed peppermint candies or candy canes, if you don’t want the peppermint flavor you can leave out or just use to roll the cookie balls in
For The Toppings
- 1/2 cup Pretzels
- 1/2 cup Mini chocolate chips
- 1/2 to 3/4 cup Christmas sprinkles
- 1/4 cup crunches up candy canes or any peppermint candies, this is optional
How to Make Santa’s Kitchen Sink Cookies
Making these delicious cookies is no more difficult than any other cookie recipe. The dough recipe is simple, and the rest is simply adding in the truckload of tasty mix-ins. You’ll be in and out of the kitchen in no time with a batch of super tasty holiday cookies!
- Cream the butter and sugars until light and fluffy.
- Using a hand held mixer or stand mixer, add in egg and vanilla, beat until combined, scraping down the sides of the mixing bowl if necessary.
- Whisk the flour, baking soda, and salt together in a separate large mixing bowl.
- Mix the dry ingredients into the wet ingredients until combined.
- Use a rubber spatula to gently fold in the pretzels, chocolate chips, white chocolate chips, peanut butter chips, holiday baking chips, crushed peppermint candy, and Christmas sprinkles.
- Combine the mini chocolate chips, Christmas sprinkles, and more crushed pretzels in a small bowl.
- Scoop out balls of dough with a medium cookie scoop, form them into round balls, gently dip the tops of each cookie into the sprinkle mixture.
- Place the cookie dough balls on a baking sheet lined with parchment paper and bake at 350 for 11 to 14 minutes or until the edges begin to turn golden. You don’t want to over bake the cookies. Check after 11 minutes.
- Remove the cookies from the oven and let them cool on the cookie sheet for 5 minutes.
- Transfer the cookies to a wire cooling rack to cool completely. Enjoy!


Substitutions and Variations
- You can adjust the amount of mix-ins based on your preference, adding more or less or even omitting certain mix-ins if you prefer.
- If you don’t have kosher or sea salt, regular salt will work.
- Try adding cocoa powder to make chocolate Santa’s kitchen sink cookies.
Equipment
- Measuring cups and spoons
- Stand mixer or hand mixer
- Mixing bowls
- Cookie sheet(s)
- Parchment paper
- Wire cooling rack
- Medium cookie sheet
What to Serve with Santa’s Kitchen Sink Cookies
Serve these cookies to the kids with a glass of milk. Grown-ups can enjoy them with a cup of coffee or tea or even a nice holiday cocktail. These cookies also make the perfect addition to a larger holiday dessert table at your next gathering alongside all of your other favorite sweets.
Tips
- Be sure you beat your butter and sugars until they’re nicely light and fluffy.
- Make sure your baking soda is fresh. It makes a HUGE difference.
- Be gentle when folding your mix-ins into the cookie dough so you don’t form extra gluten.
- It’s important to take your cookies out of the oven as soon as the edges begin to turn golden. Carry-over cooking time will bake them to soft, chewy perfection.
More Cookie Recipes
FAQ
What are kitchen sink cookies?
Kitchen sink cookies are cookies that are loaded with far more mix-ins than standard cookies.
Why are they called kitchen sink cookies?
Kitchen sink cookies get their name because they’re made with everything but the kitchen sink. These cookies often feature both sweet and salty mix-ins ranging from classic baking chips to crushed pretzels, nuts, candies, or anything the baker desires.
What is the secret to soft, chewy cookies?
The easiest way to make your cookies soft and chewy is to slightly underbake them. Then, let them sit on the baking sheet for about 5 minutes to allow carry-over baking time to fully bake them in the center. This ensures the cookies are fully baked but still incredibly soft and chewy.

Santa's Kitchen Sink Cookies
These cookies are so yummy and fun to bake and decorate. Great for giving out as Christmas edible gifts. The cookies pack up well. Happy holidays to all!
Ingredients
- 1 cup unsalted butter - softened
- 1/2 cup granulated sugar
- 1/2 cup light brown sugar
- 1 large egg
- 2 teaspoons vanilla extract
- 2 1/4 cups all purpose flour
- 1 teaspoon baking soda make sure it's fresh for best flavor
- 1/4 teaspoon fine sea or kosher salt
- 1/2 to 3/4 cup pretzels - crushed
- 1 1/4 cups semi-sweet chocolate chips
- 1 1/4 cups white chocolate chips
- 1 1/8 cups peanut butter chips or milk chocolate chips
- 1 1/8 cups colored holiday chips or any colored chips, or mini M&Ms you can leave these out and use 1/2 cup more white chocolate chips and another chip of choice and add more holiday sprinkles
- 1 1/4 cups Christmas colored sprinkles
- 1 cup crushed peppermint candies or candy canes Leave out if you don't want a peppermint flavor in the cookies
For Topping
- 1/2 cup crushed up pretzels more if needed
- 1/2 cup Christmas sprinkles or nonpareils more if needed
- 1/2 cup mini chocolate chips more if needed
Instructions
-
Using a hand held mixer or stand mixer, cream the butter and sugars until light and fluffy. Add in the egg and vanilla. Mix until combined, scraping down the sides of the mixing bowl if necessary. Whisk the flour, baking soda, and salt together in a separate large mixing bowl. Mix the dry ingredients into the wet ingredients until combined. Using a rubber spatula, dig down to the bottom of the mixing bowl and make sure the dry is completely incorporated into the wet ingredients. Now, use the rubber spatula to gently fold in the pretzels, chocolate chips, white chocolate chips, peanut butter chips, holiday baking chips, crushed peppermint candy, and Christmas sprinkles. Combine the mini chocolate chips, Christmas sprinkles, and more crushed pretzels in a small bowl. Scoop out balls of dough with a medium cookie scoop, form them into round balls, gently dip each ball in the sprinkle mixture. Place the cookie dough balls on a baking sheet lined with parchment paper and bake at 350 for 12 to 14 minutes until the edges begin to turn golden. Remove the cookies from the oven and let them cool on the cookie sheet for 5 minutes. Transfer the cookies to a wire cooling rack to cool completely. Enjoy!

Thanks for stopping by. I hope you enjoy these yummy Santa’s Kitchen Sink Cookies along with the other recipes posted.
To save and collect any favorite recipes, you can pin on Pinterest. It’s a great way of saving and collecting recipes for later on.
Please stop back again soon, there’s so many more recipes to see both sweet and savory. New ones too.
Before leaving, don’t forget to scroll up to print and copy todays featured recipe.
Happy, Safe Holidays!


Disclosure: You may see links to ingredients or cooking items in the ingredient, instructions, or equipment sections of this post. I’m a participant in the Amazon Services LLC Associates Program, an affiliate advertising program. I will receive a small percentage of sales generated by these links. However, this in no way increases the price of the items.