
Single Layer Rustic Chocolate Cake
This single layer rustic chocolate cake is so decadent tasting. An easy and simple cake recipe that always comes out just right.

This cake has been such a hit with family and friends that I couldn’t wait to share it with all of you.
The first time I made this recipe for a single layer rustic chocolate cake, I wasn’t sure how it would come out.
Creating recipes isn’t easy that’s for sure.
One recipe alone could take three or more tries before it’s ready to have my family try a recipe and then be able to share here on the blog.
I must always get a thumbs up from anyone who tries a recipe.
Well, I was so happy that my whole family loved this new chocolate cake recipe as much as I did. And, we still do regularly.
It’s so simple, Easy enough to make one for a last minute dessert.
The one thing about this cake as you can see in the photos is it’s rustic looking. The top is cracked.
The first time I baked this and decided along with my family this was the winner recipe, no one even noticed that the top was cracked and a somewhat jagged. I did of course but it tasted so delicious, I didn’t even attempt to change anything in the recipe.
So, that is why I call it a rustic cake.
You can sprinkle powdered sugar on top like I show in the photos or frost the cake. It still may looked a little rustic but, that’s what it is a single layer rustic chocolate cake.
To describe the cake, it’s extra rich tasting.
What I love the most about this simple cake, it is not too sweet. It’s perfect in my book of cakes.
Made with everyday simple ingredients that has water as one of the most important components of the cake and it start off with a good quality semisweet or bittersweet chocolate. You don’t need a lot but, in my opinion, it makes a difference in the taste of the cake.
I’ve made this with both chocolates and the semisweet comes out a little bit sweeter but not by much. By the way, the cake has no eggs or dairy in the batter. Not on purpose, it just didn’t need either one for the texture and taste. The vegetable oil gives the cake a great texture and moistness.
It’s just perfect as a single layer cake. It didn’t need another layer and not even a frosting or glaze.
Of course you can add those anytime you want. Here’s a recipe that has a delicious chocolate frosting recipe and down below is a recipe for a chocolate ganache glaze.
But, first try this without any topping except maybe a dusting of powdered sugar like in the photos.
I really did that for the photo shoot. It doesn’t even need that to be honest.
I think you will be pleasantly surprised with the result. A big chocolaty yum that’s for sure!
Single Layer Rustic Chocolate Cake
Yields: between 6 to 8 servings, depending on how you slice the pieces

What goes into this delicious single layer dark chocolate cake recipe?
Here are the ingredients:
- 1 cup chopped up semisweet or bittersweet chocolate
- 1 1/2 cups water that has been boiled
- 1/2 cup granulated sugar, if you can find super fine or castor sugar that would really well in this recipe (I found the highlighted sugar on Amazon but, check your local grocery store first)
- 2 tablespoons granulated or superfine sugar
- 1 teaspoon vanilla extract, use only real vanilla extract and not the artificial flavored, this makes a big difference in recipes
- 1/3 cup vegetable oil such as canola, corn, grapeseed, or avocado oil, I would not use olive oil for this recipe
- 1 1/4 cups all purpose flour, sifted
- 1 teaspoon baking powder
- 1/4 teaspoon sea or kosher salt, fine texture is best when baking


Finished single layer chocolate cake

A nice dusting of powdered sugar looks so elegant on this rustic cake

How is this rich and delicious single layer rustic chocolate cake made?
Here are the easy directions:
- Preheat the oven to 320 degrees or 160 Celsius. Ensure your bottom and sides fit together securely. Once the sides and bottom are put together, make sure the latches are shut tightly.
- Place foil under and on the sides of a 9 inch springform pan. Press the foil against the sides and bottom to make it snug. Spray the pan with cooking or baking spray then line the bottom only with a piece of parchment paper. (See photo above, you can cut the paper or buy precut round parchment paper) Spray the parchment with the cooking or baking spray. Also, line a rimmed cookie sheet or baking sheet pan with foil. Set both aside.
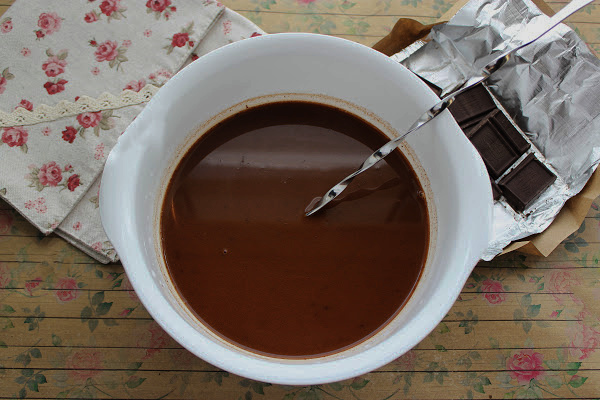
- Chopped chocolate and place in a heatproof bowl. Add the hot boiling water and stir until the chocolate dissolves completely.
- Now, add in the 1/2 cup of sugar and the 2 tablespoons together. Stir, stir, stir.
- Add in the vanilla extract and vegetable oil. Stir again.
- After you measure out the flour, sift with the salt and baking powder.
- Time to add in the flour mixture. Gently stir until all the dry is combined into the chocolate mixture. Dig down in the bowl to incorporate well. Try not to over mix. The batter will be runny. Pour the batter into the prepared cake pan.
- Place the prepared springform pan directly onto the lined baking sheet/cookie sheet. Bake for about 45 to 60 minutes. Start checking after 45 minutes. The cake will be done when you lightly touch the top and it will spring back just a bit and a toothpick or wooden skewer comes out clean or with dry crumbs. (The cake is likely to crack on top like mine did in the photos, no worries, it will still taste amazing) Take out and let the pan cool on a wire rack for at about 30 minutes. After that, gently release the latch, don’t open it up all the way at this point. Let cool another 15 minutes.
- Take a butter knife and gently run it around the edges of the pan. Now, gently open up the latches all the way and remove the ring. Leave on the base for another 10 minutes or so. Take that same butter knife and ever so gently slide it between the bottom of the cake and the bottom part of the springform pan. This should loosen up the cake. Using a large spatula or your hands, gently pick up the cake and place on a serving plate. Your delicious cake is ready to slice up.
Enjoy the rich tasting dark chocolate cake

Before leaving, here are a few more recipes that have chocolate in them…
No Machine Creamy Chocolate Ice Cream
Easy Bisquick Chocolate Chip Cookies
Simple Patriotic Star Brownies
Amazing Flourless Chocolate Molten Cake
Mint Chip Cheesecake Swirl Brownies
Copycat Starbucks Dunkin Donuts Salted Hot Chocolate
Chocolate Sour Cream Turkey Cupcakes

Single Layer Rustic Chocolate Cake
This single layer rustic chocolate cake is so decadent tasting. An easy and simple cake recipe that always comes out just right.
Ingredients
- 1 cup chopped up semisweet or bittersweet chocolate
- 1/2 cups water that has been boiled
- 1/2 cup granulated sugar, if you can find super fine or castor sugar that would really well in this recipe (I found the highlighted sugar on Amazon but, check your local grocery store first)
- 2 tbsp granulated or superfine sugar
- 1 tsp vanilla extract, use only real vanilla extract and not the artificial flavored, this makes a big difference in recipes
- 1/3 cup vegetable oil such as canola, corn, grapeseed, or avocado oil, I would not use olive oil for this recipe
- 1 1/4 cups all purpose flour, sifted
- 1 tsp baking powder
- 1/4 tsp sea or kosher salt, fine texture is best when baking
Instructions
-
Preheat the oven to 320 degrees or 160 Celsius. Ensure your bottom and sides fit together securely. Once the sides and bottom are put together, make sure the latches are shut tightly. Place foil under and on the sides of a 9 inch springform pan. Press the foil against the sides and bottom to make it snug. Spray the pan with cooking or baking spray then line the bottom only with a piece of parchment paper. (See photo above, you can cut the paper or buy precut round parchment paper) Spray the parchment with the cooking or baking spray. Also, line a rimmed cookie sheet or baking sheet pan with foil. Set both aside. Chopped chocolate and place in a heatproof bowl. Add the hot boiling water and stir until the chocolate dissolves completely. Now, add in the 1/2 cup of sugar and the 2 tablespoons together. Stir, stir, stir. Add in the vanilla extract and vegetable oil. Stir again. After you measure out the flour, sift with the salt and baking powder. Time to add in the flour mixture. Gently stir until all the dry is combined into the chocolate mixture. Dig down in the bowl to incorporate well. Try not to over mix. The batter will be runny. Pour the batter into the prepared cake pan. Place the prepared springform pan directly onto the lined baking sheet/cookie sheet. Bake for about 45 to 60 minutes. Start checking after 45 minutes. The cake will be done when you lightly touch the top and it will spring back just a bit and a toothpick or wooden skewer comes out clean or with dry crumbs. (The cake is likely to crack on top like mine did in the photos, no worries, it will still taste amazing) Take out and let the pan cool on a wire rack for at about 30 minutes. After that, gently release the latch, don’t open it up all the way at this point. Let cool another 15 minutes. Take a butter knife and gently run it around the edges of the pan. Now, gently open up the latches all the way and remove the ring. Leave on the base for another 10 minutes or so. Take that same butter knife and ever so gently slide it between the bottom of the cake and the bottom part of the springform pan. This should loosen up the cake. Using a large spatula or your hands, gently pick up the cake and place on a serving plate. Your delicious cake is ready to slice up.
Here’s the 2 ingredient quick and easy recipe for a chocolate ganache glaze
![]()
1 cup good quality semisweet chocolate chips
1/2 cup heavy cream
Heat cream on stove just to a soft boil, pour the hot cream over a bowl of the chocolate chips. Let stand for about 3 to 4 minutes without stirring. Then whisk the mixture until the ganache is shiny and thickened. That’s it, ready to pour over the cake.

Thanks for stopping by. I hope you enjoyed todays featured recipe.
Be sure to scroll up so you can copy and print out the recipe.
A great way to collect and save any recipe is to pin them on Pinterest.
Please stop back again soon. There are so many more recipes to see both sweet and savory and new ones too.
Bye for now…


Disclosure: You may see links to ingredients or cooking items in the ingredient, instructions, or equipment sections of this post. I’m a participant in the Amazon Services LLC Associates Program, an affiliate advertising program. I will receive a small percentage of sales generated by these links. However, this in no way increases the price of the items.


Can this be made in a 13×9 baking pan ?
Hi, it may come out very thin. Bake it for less time.
Wow – beets! I was definitely surprised… but when you think of what grated carrots add to carrot cake – it makes total sense. Beets are so versatile! I am definitely going to have to make this for my family and have them try to guess the secret ingredient. Thanks so much for sharing!
Hi Amanda, thanks so much for your sweet comment! I really appreciate it! This really is our favorite cake. You can’t taste the beets but they really add great moistness and I love not having to add any oil or butter. BTW, love your blog! Everyone needs to check out @Coriander Lime. Take care and thanks again! Sweet Smiles, Pam 🙂